> ## Documentation Index
> Fetch the complete documentation index at: https://runpod-b18f5ded-admin-mcp-seo-index-all-pages-86b037e.mintlify.site/llms.txt
> Use this file to discover all available pages before exploring further.
# Integrate Runpod with n8n
> Deploy a vLLM worker on Runpod and connect it to n8n for AI-powered workflow automation.
Learn how to integrate Runpod Serverless with n8n, a workflow automation tool. By the end of this tutorial, you'll have a vLLM endpoint running on Runpod that you can use within your n8n workflows.
For a faster start, you can point your n8n workflow to an OpenAI-compatible [Public Endpoint](/public-endpoints/overview) instead of deploying a vLLM worker. To do this, skip to [step 2](#step-2%3A-create-an-n8n-workflow) to create your workflow, then in step 3, set the base URL to the Public Endpoint URL for [Qwen3 32B AWQ](/public-endpoints/models/qwen3-32b):
```
https://api.runpod.ai/v2/qwen3-32b-awq/openai/v1
```
## What you'll learn
In this tutorial, you'll learn how to:
* Deploy a vLLM worker serving the `Qwen/qwen3-32b-awq` model.
* Configure your environment variables for n8n compatibility.
* Create a simple n8n workflow to test your integration.
* Connect your workflow to your Runpod endpoint.
## Requirements
Before you begin, you'll need:
* A [Runpod account](/accounts-billing/manage-accounts) (with available credits).
* A [Runpod API key](/get-started/api-keys).
* An [n8n](https://n8n.io/) account.
## Step 1: Deploy a vLLM worker on Runpod
First, you'll deploy a vLLM worker to serve the `Qwen/qwen3-32b-awq` model.
Open the [Runpod console](https://www.console.runpod.io/serverless) and navigate to the Serverless page.
Click **New Endpoint** and select **vLLM** under **Ready-to-Deploy Repos**.
For more details on vLLM deployment options, see [Deploy a vLLM worker](/serverless/vllm/get-started).
In the deployment modal:
* In the **Model** field, enter `Qwen/qwen3-32b-awq`.
* Expand the **Advanced** section to configure your vLLM environment variables:
* Set **Max Model Length** to `8192`.
* Near the bottom of the page, check **Enable Auto Tool Choice**.
* Set **Tool Call Parser** to `Hermes`.
* Set **Reasoning Parser** to `Qwen3`.
* Click **Next**.
* Click **Create Endpoint**.
When using a different model, you may need to adjust your vLLM environment variables to ensure your model returns responses in the format that n8n expects.
Your endpoint will now begin initializing. This may take several minutes while Runpod provisions resources and downloads your model. Wait until the status shows as **Running**.
Once deployed, you'll be taken to the detail page for your endpoint in the Runpod console. You can find your endpoint ID in the **Overview** tab:
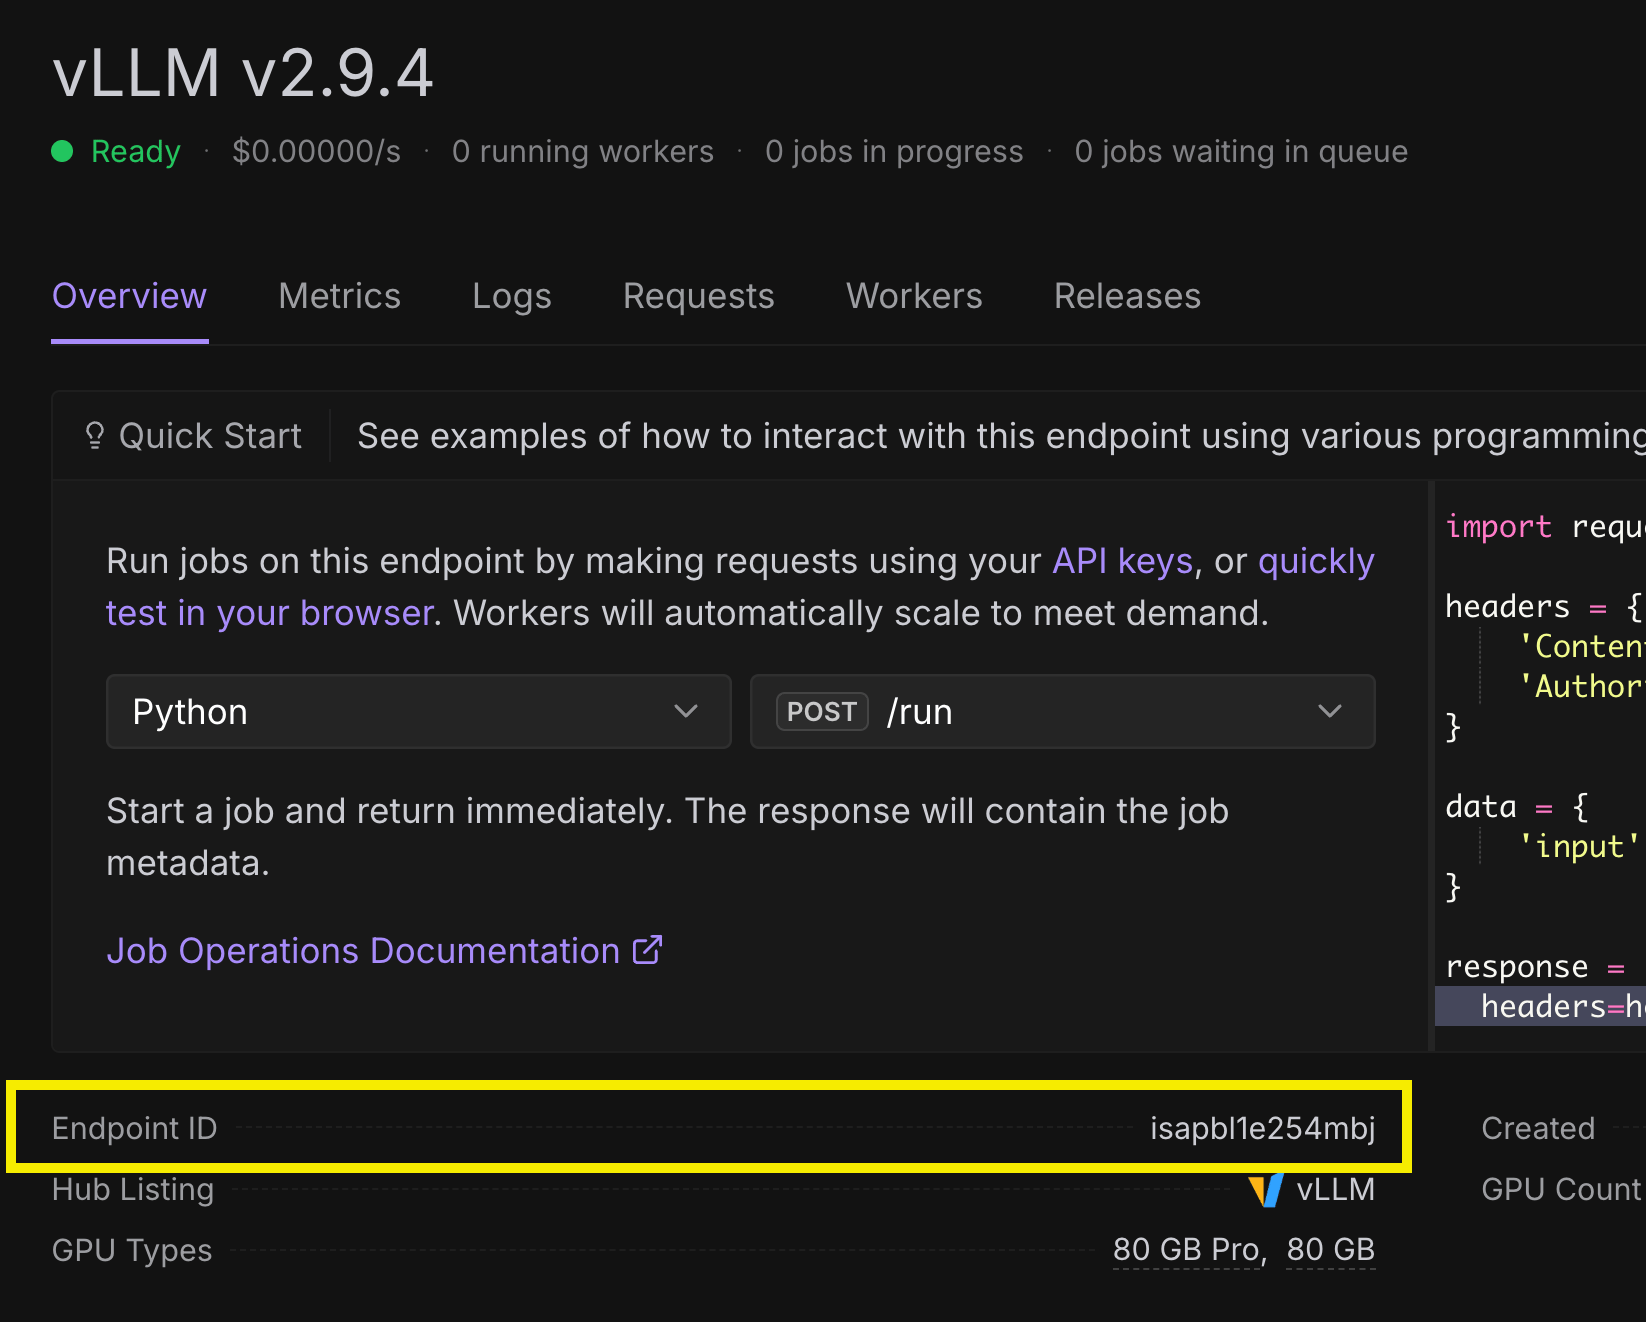 You can also find your endpoint ID in the URL of the endpoint detail page. For example, if the URL for your endpoint is `https://console.runpod.io/serverless/user/endpoint/isapbl1e254mbj`, the endpoint ID is `isapbl1e254mbj`.
Copy your endpoint ID to your clipboard. You'll need it to configure your n8n workflow.
## Step 2: Create an n8n workflow
Next, you'll create a simple n8n workflow to test your integration.
Open n8n and navigate to your workspace, then click **Create Workflow**.
Click **Add first step** and select **On chat message**. Click **Test chat** to confirm.
Click the **+** button and search for **AI Agent** and select it. Click **Execute step** to confirm.
Click the **+** button labeled **Chat Model**. Search for **OpenAI Chat Model** and select it.
Click the dropdown under **Credential to connect with** and select **Create new credential**.
## Step 3: Configure the OpenAI Chat Model node
Now you'll configure the n8n OpenAI Chat Model node to use the model running on your Runpod endpoint.
Under **API Key**, add your Runpod API Key. You can create an API key on the settings page of the [Runpod console](https://console.runpod.io/user/settings).
Under **Base URL**, replace the default OpenAI URL with your Runpod endpoint URL:
```
https://api.runpod.ai/v2/ENDPOINT_ID/openai/v1
```
Replace `ENDPOINT_ID` with your vLLM endpoint ID from Step 1.
Click **Save**, and n8n will automatically test your endpoint connection.
It may take a few minutes for your endpoint to scale up a worker to process the request. You can monitor the request using the **Workers** and **Requests** tabs for your vLLM endpoint in the Runpod console.
If you see the message "Connection tested successfully," that means your endpoint is reachable, but it doesn't gaurantee that it's fully compatible with n8n—we'll do that in the next step.
Press escape to return to the OpenAI Chat Model configuration modal.
Under **Model**, select `qwen/qwen3-32b-awq`, then press escape to return to the workflow canvas.
Type a test message into the chat box like "Hello, how are you?" and press enter.
If everything is working correctly, you should see each of the nodes in your workflow go green to indicate successful execution, and a response from the model in the chat box.
Make sure to **Save** your workflow before closing it, as n8n may not save changes to your model node configuration automatically.
## Next steps
Congratulations! You've successfully used Runpod to power an AI agent on n8n.
Now that you've integrated with n8n, you can:
* Build complex AI-powered workflows using your Runpod endpoints.
* Explore other [integration options](/integrations/overview) with Runpod.
* Learn about [OpenAI compatibility](/serverless/vllm/openai-compatibility) features in vLLM.
You can also find your endpoint ID in the URL of the endpoint detail page. For example, if the URL for your endpoint is `https://console.runpod.io/serverless/user/endpoint/isapbl1e254mbj`, the endpoint ID is `isapbl1e254mbj`.
Copy your endpoint ID to your clipboard. You'll need it to configure your n8n workflow.
## Step 2: Create an n8n workflow
Next, you'll create a simple n8n workflow to test your integration.
Open n8n and navigate to your workspace, then click **Create Workflow**.
Click **Add first step** and select **On chat message**. Click **Test chat** to confirm.
Click the **+** button and search for **AI Agent** and select it. Click **Execute step** to confirm.
Click the **+** button labeled **Chat Model**. Search for **OpenAI Chat Model** and select it.
Click the dropdown under **Credential to connect with** and select **Create new credential**.
## Step 3: Configure the OpenAI Chat Model node
Now you'll configure the n8n OpenAI Chat Model node to use the model running on your Runpod endpoint.
Under **API Key**, add your Runpod API Key. You can create an API key on the settings page of the [Runpod console](https://console.runpod.io/user/settings).
Under **Base URL**, replace the default OpenAI URL with your Runpod endpoint URL:
```
https://api.runpod.ai/v2/ENDPOINT_ID/openai/v1
```
Replace `ENDPOINT_ID` with your vLLM endpoint ID from Step 1.
Click **Save**, and n8n will automatically test your endpoint connection.
It may take a few minutes for your endpoint to scale up a worker to process the request. You can monitor the request using the **Workers** and **Requests** tabs for your vLLM endpoint in the Runpod console.
If you see the message "Connection tested successfully," that means your endpoint is reachable, but it doesn't gaurantee that it's fully compatible with n8n—we'll do that in the next step.
Press escape to return to the OpenAI Chat Model configuration modal.
Under **Model**, select `qwen/qwen3-32b-awq`, then press escape to return to the workflow canvas.
Type a test message into the chat box like "Hello, how are you?" and press enter.
If everything is working correctly, you should see each of the nodes in your workflow go green to indicate successful execution, and a response from the model in the chat box.
Make sure to **Save** your workflow before closing it, as n8n may not save changes to your model node configuration automatically.
## Next steps
Congratulations! You've successfully used Runpod to power an AI agent on n8n.
Now that you've integrated with n8n, you can:
* Build complex AI-powered workflows using your Runpod endpoints.
* Explore other [integration options](/integrations/overview) with Runpod.
* Learn about [OpenAI compatibility](/serverless/vllm/openai-compatibility) features in vLLM.